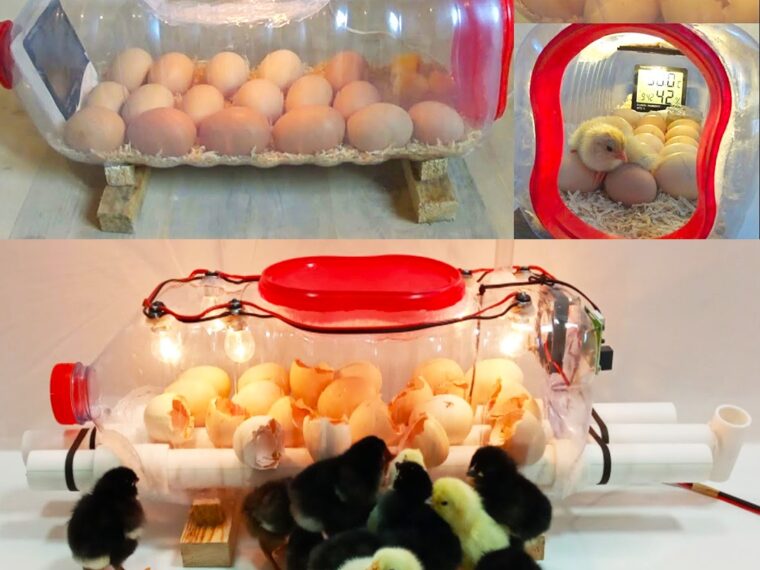
- Prepare the Water Bottle:
- Clean the water bottle thoroughly and remove any labels.
- Cut a small opening near the bottom for the heat source. If using a light bulb, ensure it fits snugly.
- Create Airflow:
- If using a fan, cut a small hole near the top of the bottle and secure the fan inside. This will help maintain consistent air circulation.
- Set Up the Heat Source:
- If using a light bulb, place it in the opening you made. Ensure it doesn’t touch the plastic to avoid melting.
- If using a heating pad, place it at the bottom of the bottle.
- Add Temperature and Humidity Monitors:
- Place the thermometer and hygrometer inside the bottle. These will help you monitor the incubator’s conditions.
- Create an Egg Support:
- Use wire or string to create a small shelf or holder where the eggs will sit, ensuring they are secure and not touching the sides of the bottle.
- Maintain Humidity:
- Place a small dish of water or a sponge at the bottom of the incubator to maintain humidity levels. This is crucial for proper incubation.
- Seal the Incubator:
- Use duct tape or glue to seal any openings to maintain temperature and humidity. Ensure there’s still a way to monitor the thermometer and hygrometer.
- Test the Incubator:
- Before adding eggs, run the incubator for a day or two to check that the temperature is stable (ideally around 99-102°F) and humidity is adequate (around 40-60%).
- Add the Eggs:
- Once conditions are stable, carefully place the eggs in the incubator. Turn them regularly (at least 3-5 times a day) for the best results.
- Monitor and Adjust:
- Continuously monitor the temperature and humidity, making adjustments as needed.
Tips
- Keep the incubator in a quiet, stable environment away from direct sunlight and drafts.
- Research specific incubation times and conditions for the type of eggs you are using.
With patience and care, you can successfully incubate eggs using this simple DIY method
Pages: 1 2


